If you’re using a mouse with DPI set below 500, you’re in the right place. This guide is for Free Fire PC players who want a sensitivity setup that works with low DPI — giving you precise, jitter-free aiming without sacrificing speed. By the end, you’ll have a solid baseline sensitivity that you can tweak for your playstyle, plus tips to avoid common mistakes that ruin your aim.
Low DPI might feel sluggish at first, but it’s actually a tool for consistency. With the right in-game settings, you’ll land more headshots and control recoil like a pro. I’ll walk you through each step, from checking your hardware to dialing in the perfect sensitivity. Let’s get started.
What You’ll Need
- Free Fire installed on PC (via emulator like Gameloop or official client)
- A mouse with DPI set to 500 or lower (check software or hardware button)
- Access to in-game Sensitivity settings (gear icon → Settings → Sensitivity)
- Free Fire Training Mode unlocked (or a custom room for practice)
- 10–15 minutes of uninterrupted time to test and adjust
Step 1: Confirm Your Mouse DPI
Before touching in-game sliders, make sure your mouse is actually running at or below 500 DPI. Many gaming mice have a DPI button on top or near the scroll wheel. Press it to cycle through presets, and check your mouse software for exact values. If you’re unsure, aim for the lowest setting (often 400 or 800 DPI) and work down. For this guide, we’ll use 500 DPI as the cap.
Step 2: Reset to Default Sensitivity
Open Free Fire, go to Settings → Sensitivity, and tap the “Reset” button (usually a circular arrow icon). This clears any previous tweaks and gives you a clean slate. Your default values will be something like General: 80, Red Dot: 70, etc. We’ll build from there for low DPI.
Step 3: Set Your Baseline Sensitivities
With default reset, adjust these key sliders for a low-DPI baseline. These numbers are a starting point — you’ll fine-tune later. Enter them exactly:
- General: 60
- Red Dot: 55
- 2x Scope: 50
- 4x Scope: 40
- Sniper Scope: 35
- Free Look: 50
Why these numbers? Low DPI loves slightly higher in-game values to compensate. A General of 60 at 500 DPI gives you a comfortable 360° turn speed without being too twitchy. For scopes, lower values prevent over-aiming. If you play a lot with the red dot, keep the red dot sensitivity a bit higher — that’s why it’s 55.
Step 4: Fine-Tune in Training Mode
Head to Training Mode (from the lobby, tap “Training” at the bottom). Pick up your favorite weapons — M1014, M4A1, and a sniper. Practice these drills:
- Flick to stationary targets from a distance — adjust General if you consistently overshoot or undershoot.
- Track a moving target (the running bots) — tweak Red Dot sensitivity so the crosshair stays on target smoothly.
- Fire full-auto at a wall to see your spray pattern — if it climbs too fast, lower General by 5; if it’s too slow, raise it by 5.
Make small adjustments (2–5 points) and test again. Do this for 5–10 minutes until the aim feels natural. Remember, consistency is key: if you change your mouse DPI later, you’ll need to redo this step.
Step 5: Test in Real Matches
Once training mode feels good, jump into a Clash Squad or Battle Royale match. Focus on mid-range fights first. Pay attention to:
- How quickly you can turn 180° — if it’s too slow, raise General by 5; if it’s too fast, lower it.
- Recoil control with scopes — if the 2x scope wobbles, lower that specific slider by 5.
- Sniping accuracy — if you’re missing flicks, lower sniper scope sensitivity gradually.
After each match, make one or two small tweaks. Over a few games, you’ll find the sweet spot for your playstyle. For more detailed comparisons, check out our sensitivity comparison which breaks down different setups.
Common Pitfalls
- Copying high-DPI settings directly: If you watch streamers using 1600 DPI, their 80 General will feel super slow on 500 DPI. Always translate their eDPI (DPI × sensitivity) instead of copying numbers. For 500 DPI, you’ll need higher in-game values — roughly 1.5× to 2× what they use.
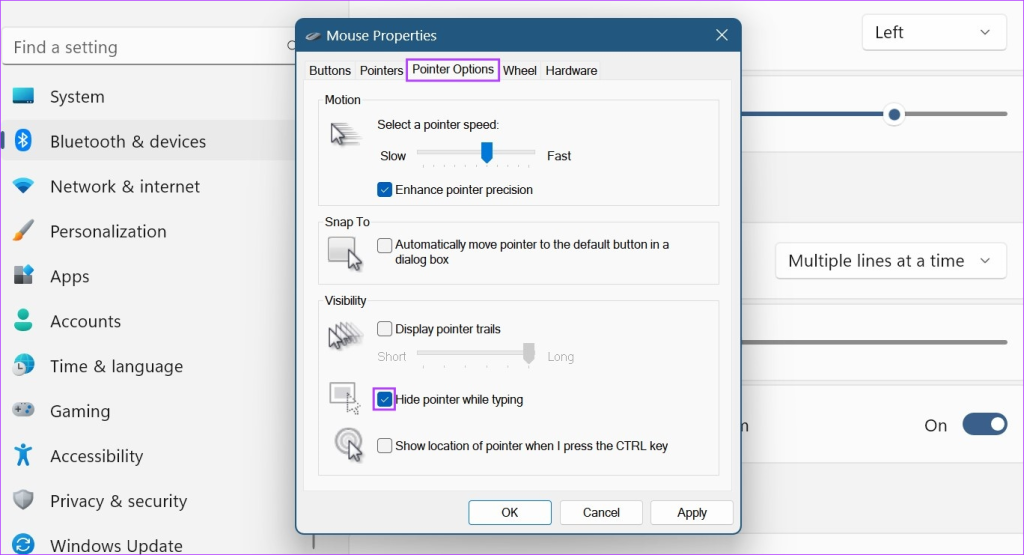
- Leaving mouse acceleration on: Windows has a setting called “Enhance pointer precision” that messes with your consistency. Turn it off in Mouse Settings → Additional mouse options → Pointer Options → uncheck the box. Otherwise your flick shots will be unpredictable.
- Ignoring weapon-specific recoil: The same sensitivity feels different for an MP40 vs an AK. Use training mode with each weapon class to adjust your recoil control sensitivity separately. Our recoil control sensitivity guide goes deep into this.
Where to Next
Now that you have a baseline, you can go further. Our recommended sensitivity settings offer a few alternative presets to try. If you want to perfect your aim drills, the training mode sensitivity article shows advanced exercises. For a comprehensive deep dive, check out mastering sensitivity settings. And if you’re playing on a phone with gyro, don’t miss our sensitivity settings for India guide which covers region-specific adjustments.


