If you’ve ever landed a clean headshot in Free Fire and seen that juicy red damage number – 150 or 157 – you know how satisfying it is. That’s the red damage we’re talking about: the big hits that melt enemies instantly. Getting consistent red damage isn’t just luck; it’s about having the right sensitivity settings that let you control your aim with muscle memory. This guide is for anyone who’s tired of spraying and praying, and wants to dial in their sensitivity to hit those high-damage shots every time.
By the end of this tutorial, you’ll have a set of sensitivity values that you can copy directly into your Free Fire settings. I’ll walk you through the DPI, camera, and ADS sensitivities, plus some training tips to make the red damage your new normal. Whether you’re a thumb player or a claw user, these settings are tested and proven to work on most devices. Let’s get those big numbers popping.
What You’ll Need
- A phone or tablet running Free Fire (any device)
- At least 15 minutes of free time to test and tweak
- A stable internet connection (ping under 100ms ideal)
- Access to Free Fire’s sensitivity menu (Settings > Sensitivity)
- Optional: a pointer speed tool or mouse DPI settings if using emulator
Step 1: Understand Red Damage Mechanics
Red damage happens when you hit the head or deal high damage with specific weapons like the AWM, M82B, or shotguns. But even SMGs can land red damage if you hit the head. Your sensitivity controls how much your crosshair moves when you swipe. For consistent headshots, you need a sensitivity that’s fast enough to flick but slow enough to micro-adjust. Start by knowing your playstyle: aggressive rushers need higher general sensitivity, while passive players can go lower.
Step 2: Set Your DPI and Pointer Speed
If you’re on Android, go to Settings > Developer Options (enable by tapping Build Number 7 times) and look for Pointer Speed. Set it to 80-90% for a good balance. On iOS, pointer speed isn’t adjustable natively, but you can use a game booster app. For emulator players, set your mouse DPI to 800-1000. This base sensitivity affects your overall swipes. Write down your current pointer speed as a reference.
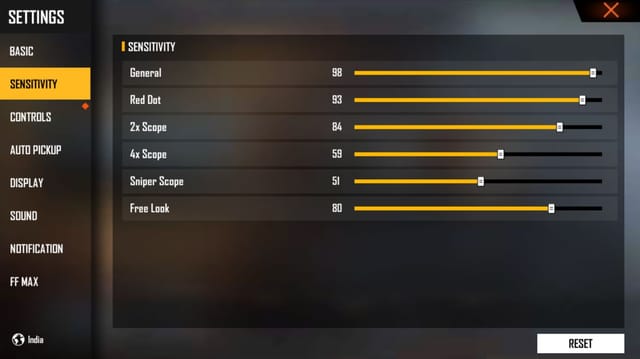
Step 3: Copy These Sensitivity Values
Open Free Fire, go to Settings > Sensitivity. Use these values as a starting point. They’re optimized for red damage – meaning they prioritize precision over raw speed. Tweak them later if needed.
- General Sensitivity: 90-100 (for quick 180 turns)
- Red Dot & T500 Scope: 45-50
- 2x Scope: 35-40
- 4x Scope: 25-30
- Sniper Scope: 15-20
- Free Look: 50
These values work well for most devices. If your phone has lower refresh rate (60Hz), stick to the lower end. For 90Hz+ displays, you can go higher. Test in the training ground.
Step 4: Train Your Muscle Memory
Now go to the training ground. Pick an AR like the M4A1 or SCAR. Practice snapping to the head of the moving bots. Do 10 minutes of flicks (quick aim from hip to head) and 10 minutes of tracking (follow the head while firing). Your goal is to see red damage numbers consistently. If you feel the aim is too fast or too slow, adjust your General and Red Dot sensitivity by 5 points until it feels natural.
Step 5: Fine-Tune for Your Weapon Loadout
Different weapons need different ADS sensitivities. For snipers, use a lower scope sensitivity (15-20) to avoid over-flicking. For shotguns, keep General sensitivity high for quick close-range flicks. If you use two weapons frequently, set your loadout to your strongest combo – like an AR + Sniper – and adjust scope sensitivities separately. Don’t forget to save your settings as a custom preset using the built-in save slots.
Common Pitfalls
- Using the same sensitivity for all scopes: Each scope has a different field of view. Using one value for everything will make your aim shaky at range or too slow up close. Always dial in individual scope sensitivities.
- Copying pro settings blindly: Pros have different devices, grip styles, and pointer speeds. Their settings may not work on your 60Hz phone. Always test and tweak based on your own feel.
- Not practicing regularly: Even the best sensitivity is useless without muscle memory. Spend at least 5 minutes in training before jumping into ranked. Consistent practice is the real secret to red damage.
Where to Next
You’ve got the baseline for red damage. Next, check out our sensitivity settings for ranked mode to lock in during competitive games. If you prefer close combat, our rush sensitivity settings will help you dominate in hot drops. Don’t forget to explore the sensitivity and aim combo guide for advanced techniques, or the non gyroscope sensitivity settings if you play without gyro. For even finer control, read the sensitivity settings for precision aim. And if you want to build from scratch, the custom sensitivity settings guide is perfect. Happy hunting – go get those red damage kills!