If you’re rocking a mouse with DPI above 1000, you know the struggle: one tiny flick sends your crosshair flying across the screen. But don’t worry — with the right Free Fire sensitivity settings, you can tame that high-DPI beast and land every shot. This guide is for players using mice at 1000 DPI or higher (think 1600, 2400, even 3200). By the end, you’ll have a custom sensitivity profile that balances speed and precision, so you can track enemies and hit headshots consistently.
We’ll walk through adjusting general sensitivity, scope sensitivities, and even fine-tune with aim training. Whether you’re a claw player or a gyro user on mobile? No, this is for PC players using high-DPI mice. But if you’re on mobile, check out our ultimate sensitivity guide for touch controls. Ready? Let’s dial in those settings.
What you’ll need
- Free Fire installed on PC (via emulator such as Gameloop or official PC version)
- A mouse with DPI setting above 1000 (e.g., 1600, 2400, 3200)
- Aim training or practice mode access (in-game training grounds)
- Patience – expect to spend 15-20 minutes testing
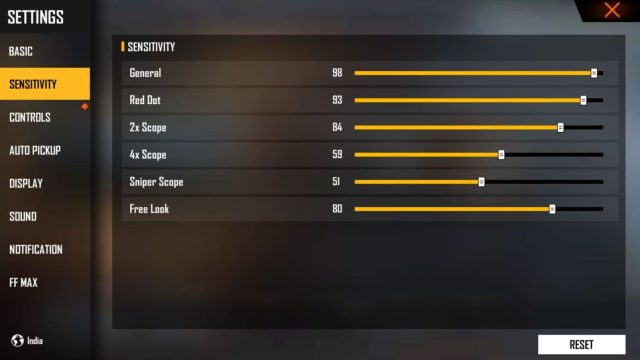
Step 1: Access the Sensitivity Settings Menu
Open Free Fire and head to the main lobby. Tap the gear icon (Settings) in the top-right corner. Then select the ‘Sensitivity’ tab. Here you’ll see sliders for General, Red Dot, 2X Scope, 4X Scope, Sniper Scope, and Free Look. Take a screenshot of your current settings – you might want to revert later.
Step 2: Set Your General Sensitivity
General sensitivity controls your overall camera movement when not aiming down sights. For high DPI (e.g., 1600), start between 50-60. If you’re at 2400 DPI, drop to 40-50. Adjust in increments of 5 until you can make a 180° turn with a comfortable swipe across your mousepad. Too fast? Lower it. Too slow? Raise it. The goal is a balance – you shouldn’t feel like you’re fighting the cursor.
Step 3: Adjust Red Dot and Scope Sensitivities
High DPI makes scoped aiming extra twitchy. For Red Dot, set it to 65-75% of your general sensitivity. For 2X Scope, try 55-65%. 4X Scope should be lower at 40-50%. Sniper Scope – keep it at 30-40% to avoid overscoping. These numbers are starting points; tweak them in training mode until you can land consistent headshots on moving targets. For more fine-tuning, see our custom sensitivity settings.
Step 4: Fine-Tune for Your Exact DPI
Not all high DPIs are equal. If you’re using 3200 DPI, lower every sensitivity by another 10-15% compared to 1600 DPI. If you’re on 1000 DPI exactly, you can bump up a bit. A pro tip: use a DPI calculator to convert settings from known low-DPI guides. For example, if a pro uses 400 DPI and 100 general, you’d need around 25 general at 1600 DPI (400/1600*100 ≈ 25). Check out our DPI 500 settings for a comparison. For extreme DPIs like 2400+, refer to our ultra high DPI settings.
Step 5: Test and Adjust in Training Mode
Enter the Training Grounds and spawn some bots. Practice tracking, flick shots, and quick scopes. Pay attention to whether you overshoot or undershoot. If you consistently aim past your target, lower the corresponding sensitivity. If you’re short, increase it. Repeat until it feels natural. Our tested settings can serve as a baseline.
Common pitfalls
- Setting sensitivity too low thinking high DPI needs ultra-low – you still need some speed for quick turns. Don’t go below 30 general unless at 3200+ DPI.
- Ignoring scope sensitivities – high DPI magnifies errors in scoped sensitivity. Always adjust each scope individually.
- Forgetting to apply after changing – Free Fire sometimes applies settings automatically, but double-check by exiting and re-entering the sensitivity menu.
Where to next
Once you’ve dialed in your high-DPI settings, consider refining your overall aim with our pro player sensitivity guide. Also, check out the ultimate sensitivity guide for additional tips. Happy hunting!