Hey Free Fire player! If you’re new and keep missing shots, or your crosshair feels too twitchy or sluggish, this guide is for you. We’re keeping it dead simple — no confusing percentages, no pro formulas. By the end of this 5-minute read, you’ll have a clean baseline sensitivity that works on almost any phone. You can always tweak it later, but this will get you fragging consistently.
A lot of “pro settings” you see online are tuned for specific devices or playstyles. That’s why I recommend starting with something universal. We’ll go step by step, and I’ll even show you where to practice. Let’s get your aim right.
What You’ll Need
- Free Fire app installed on your phone or tablet
- A steady Wi-Fi or mobile data connection
- 5 minutes of free time – no other tools needed
Step 1: Open Free Fire and Go to Settings
Launch Free Fire and tap the gear icon on the top-right corner of the lobby. This opens the Settings menu. Don’t worry about all the tabs – we only need the Sensitivity section.
Step 2: Find the Sensitivity Tab
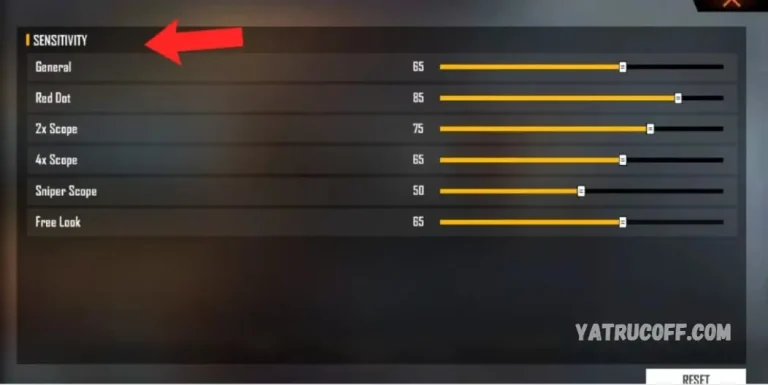
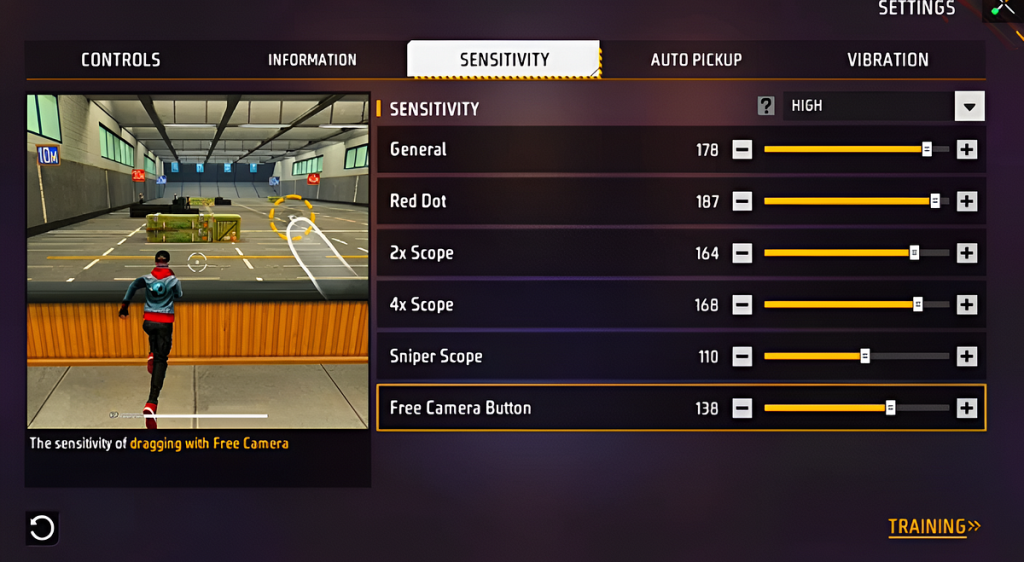
Inside Settings, tap the “Sensitivity” tab. You’ll see sliders for General, Red Dot, 2x Scope, 4x Scope, Sniper Scope, and ADS. If your game language isn’t English, look for the icon that looks like a crosshair or a scope.
Step 3: Set General Sensitivity to 75
General sensitivity controls your camera movement when hip-firing (not aiming down sights). A value of 75 is a safe middle ground. It’s fast enough to flick but not so fast that you overshoot. Drag the slider right to 75. If that feels too slow later, bump it to 85, but keep it here for now.
General sensitivity affects how quickly you turn around. 75 works for most players. If you use a gaming phone sensitivity settings guide, they might recommend higher values — but start low for consistency.
Step 4: Adjust Scope Sensitivities
Now for scopes. These control your aim speed when you zoom in. Set these values:
- Red Dot: 60
- 2x Scope: 50
- 4x Scope: 40
- Sniper Scope: 30
Why lower numbers for higher zoom? Because the target appears bigger, so you need finer control. These values let you track enemies without jitter. If you prefer close combat, you might later adjust to a higher red dot — check our close combat settings for that.
Step 5: Set ADS Sensitivity to 60
ADS (Aim Down Sights) sensitivity kicks in when you tap the aim button with any weapon that doesn’t have a scope attached (like iron sights). Set it to 60. This keeps your hip-fire to ADS transition smooth. If you’re using an AK47, the ADS recoil pattern is easier to control with a sensitivity around 55–60 – you can tune it later with an AK47 sensitivity guide.
Step 6: Practice in Training Mode
Exit settings and head to Training mode. Stand in front of the moving targets and practice tracking them. Try flicking between stationary targets. If your crosshair flies past the target, lower the corresponding slider by 5. If it feels too slow, bump it up. Spend at least 5 minutes here.
This step is crucial. Even with perfect numbers, you need muscle memory. If you use a four-finger claw setup, you might find certain values need tweaking because your grip gives you more control.
Common Pitfalls
- Copying pro settings blindly: Pro players have insane muscle memory and often use high sensitivity that makes your aim shaky. Start with what we gave you, then adjust by small amounts.
- Changing too many sliders at once: If you change 5 values and your aim feels off, you won’t know which one caused it. Adjust one slider, test, then move to the next.
- Ignoring your phone’s performance: Low FPS can make sensitivity feel different. If your phone lags, keep sensitivity lower (under 70) to avoid overshooting during frame drops.
Where to Next?
You’ve got a solid baseline! Now take it into real matches. As you improve, you can fine-tune your settings. Learn how to save your sensitivity settings to backup this baseline before experimenting. For faster kills, check out one tap sensitivity or explore dedicated guides for specific weapons. Happy fragging!
