If you’re playing Free Fire on a PC emulator (like Gameloop, BlueStacks, or LDPlayer), you already know that default sensitivity settings feel way off. The mouse and keyboard offer precision that a phone screen can’t match, but without tweaking your sensitivity, you’ll be spraying bullets everywhere. This guide is for every emulator player who wants to lock in their aim, land headshots consistently, and dominate their ranked games. By the end, you’ll have a customized sensitivity profile that feels natural for your hardware and playstyle.
We’ll walk you through the entire process—from choosing the right emulator and setting up your mouse DPI, to fine-tuning each scope in the training ground. Along the way, you’ll also learn how to import sensitivity settings from pros and backup your own. No more guesswork—just straight, actionable steps that work on any emulator.
What You’ll Need
- A PC or laptop running Windows (macOS emulators exist but are less common)
- A gaming mouse with adjustable DPI (recommended: 400–800 DPI for Free Fire)
- Keyboard and mouse (obviously)
- Your preferred Android emulator installed (Gameloop is the official one, but BlueStacks 5 or LDPlayer 9 work great)
- Free Fire installed on the emulator and logged in
- About 20–30 minutes of uninterrupted time in the Training Ground
If you haven’t yet set up your emulator, check our guide on key mapping and display settings. But once you’re ready, jump into the game and let’s get your sensitivity dialed in.
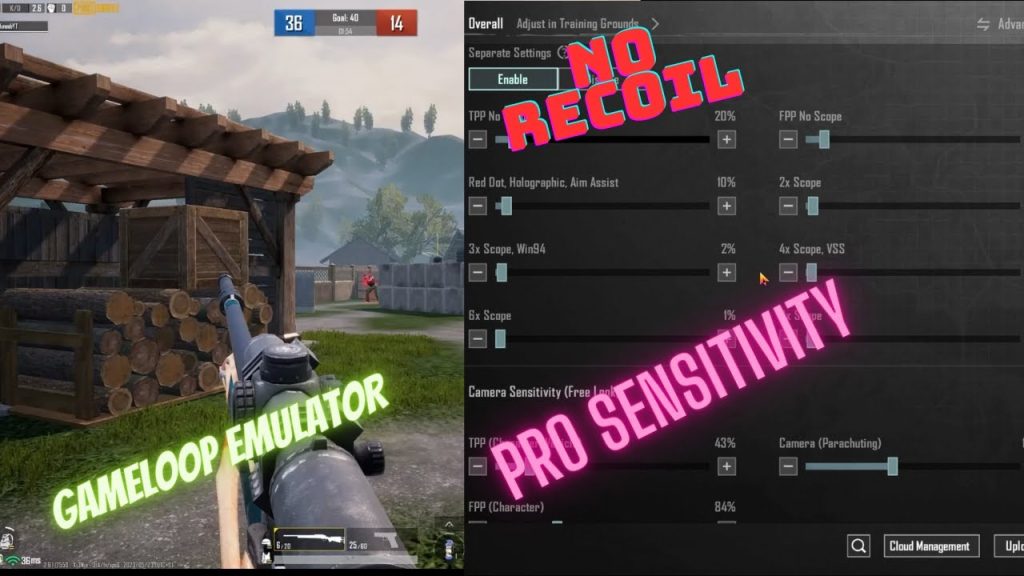
Step 1: Choose Your Emulator and Configure Basic Controls
Not all emulators handle sensitivity the same way. Gameloop is optimized for Free Fire and offers the smoothest experience, but BlueStacks and LDPlayer have their own advantages. Regardless of which you pick, make sure mouse acceleration is disabled in your Windows settings—this is crucial. Open Windows Mouse Properties > Pointer Options tab and uncheck “Enhance pointer precision.” Then set your mouse DPI to a fixed value (800 is a great starting point for most players). Now, launch Free Fire and open the sensitivity menu from the lobby settings gear icon.
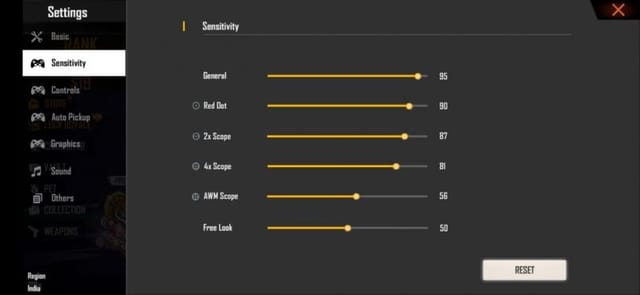
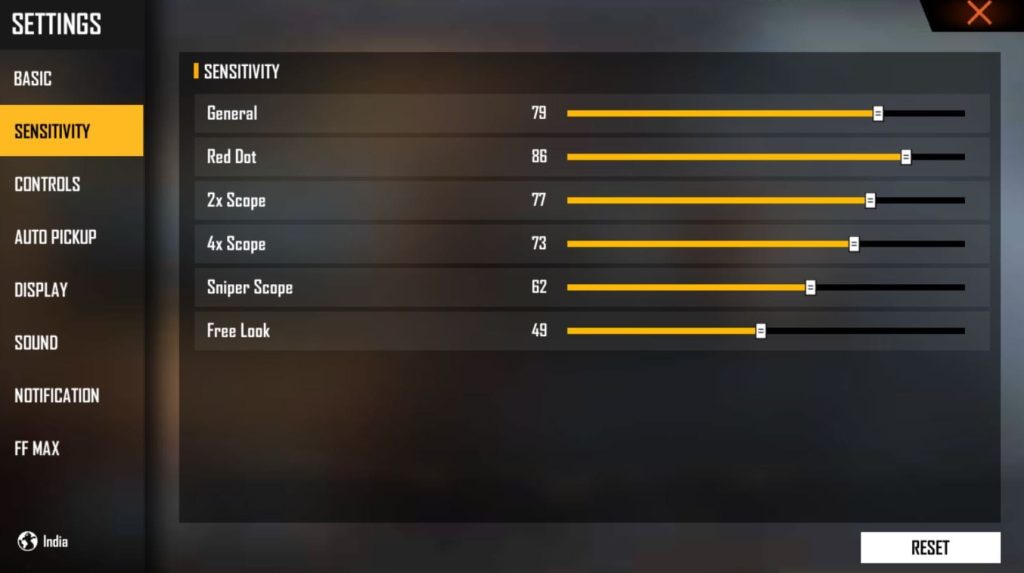
Step 2: Set Your General and Aim Sensitivity
Inside the sensitivity settings, you’ll see sliders for General, Red Dot, 2x Scope, 4x Scope, Sniper Scope, and Free Look. For emulator players, the General sensitivity is your mouse movement speed when not aiming down sights. A good starting range is 50–70 for General, depending on your DPI. For Aim sensitivity (the scope categories), start lower: 40 for Red Dot, 35 for 2x, 30 for 4x, and 25 for Sniper. These numbers mimic the lower sensitivity you’d use when aiming precisely. Don’t worry about getting it perfect now—you’ll tweak them in the next step.
Step 3: Fine-Tune in the Training Ground
This is where the real magic happens. Head to the Training Ground and grab a weapon (M4A1 or AK are good choices). Stand at a medium distance from the target dummies and practice tracking while strafing left and right. Adjust your General sensitivity so that a full swipe across your mouse pad equals a 180-degree turn. For scope sensitivities, aim at a dummy’s head and try to follow its movement as you move. Increase sensitivity if you’re under‑turning, decrease if you’re over‑shooting. Repeat until each scope feels natural. You can also check our one tap headshot settings for additional tweaks.
Step 4: Adjust High Touch Sampling and Crouch Shot Settings
Emulators don’t have native touch sampling, but the game’s sensitivity code still responds to input rate. If your emulator supports high polling rate mice (like 1000 Hz), you can use that to your advantage. Our high touch sampling settings guide covers how to emulate fast touch responses. Additionally, crouch shot mechanics rely on quick vertical aim adjustments. We have a dedicated crouch shot sensitivity settings guide that works perfectly on emulators—apply those values after you’ve set your base sens.
Step 5: Import or Manually Enter Settings from Pros
If you want a quick shortcut, you can copy settings from pro players. Many streamers share their sensitivity codes. To apply them, go to the settings gear > Sensitivity > Import Code. You can find codes on YouTube or our latest headshot sensitivity guide. Alternatively, manually enter the values we recommend in Step 2 and then adjust. The import sensitivity settings feature makes it easy to try different presets without rebuilding from scratch.
Step 6: Save and Backup Your Settings
Once you’ve dialed in your perfect sensitivity, don’t lose it! Free Fire doesn’t sync settings across devices, so you’ll need to manually save them. Take a screenshot of your settings screen or note down the values. For a more robust solution, you can backup your sensitivity settings to the cloud using a code—our backup guide explains how. This way, if you ever reinstall the game or switch emulators, you can restore your profile in seconds.
Common Pitfalls
- **Too High DPI or Sensitivity**: Many players crank their mouse DPI to 1600 or higher and combine it with high in-game sensitivity. This leads to jittery aim and micro-adjustments becoming impossible. Stick to 800 DPI and moderate sensitivity (General 50–70).
- **Ignoring Per-Scope Sensitivity**: Using the same sensitivity for all scopes is a mistake. You need lower sensitivity for higher zoom scopes to avoid over-aiming. Always customize each scope individually in the Training Ground.
- **Mouse Acceleration Enabled**: If Windows mouse acceleration is on, your crosshair movement won’t be consistent. Double-check that it’s disabled and always use raw input if your emulator supports it.
I spent hours wondering why my aim was inconsistent. Once I turned off mouse acceleration and fine-tuned per-scope, everything clicked.
Gameloop Free Fire Player
Where to Next
Your sensitivity is set—now it’s time to practice. Drop into ranked matches and focus on building muscle memory. If you want to dive deeper, check out our other guides: high touch sampling settings for smoother aim, one tap headshot settings for that instant kill, and crouch shot sensitivity settings to become a tough target. Don’t forget to backup your sensitivity settings so you never lose your perfect profile. Happy hunting!


