If you’re serious about Free Fire, you probably spend most of your time in custom servers. Whether you’re practicing with your squad, trying out new strategies, or grinding for that perfect aim, custom servers are the place to be. But here’s the thing: the sensitivity settings that work in classic rank may not translate well to the custom server environment. Different FPS, different maps, and different ping can throw off your aim. In this guide, we’ll walk you through the exact steps to dial in your Free Fire sensitivity settings for custom servers, so you can practice with confidence and see real results on game day.
By the end of this guide, you’ll have a personalized sensitivity setup that feels natural in any custom server. You’ll know how to test and tweak each setting, and you’ll even be able to save and share your configuration. Plus, we’ll point you to a handy free fire sensitivity settings helper that can speed up the whole process. Let’s get started.
What You’ll Need
- Free Fire installed on your phone (latest version recommended)
- Access to a custom server (you can create one or join a friend’s)
- A notepad app or a piece of paper to record your settings
- Patience – expect to spend at least 30 minutes testing
- Optional: a second device to screen record your gameplay
Step 1: Understand the Sensitivity Basics
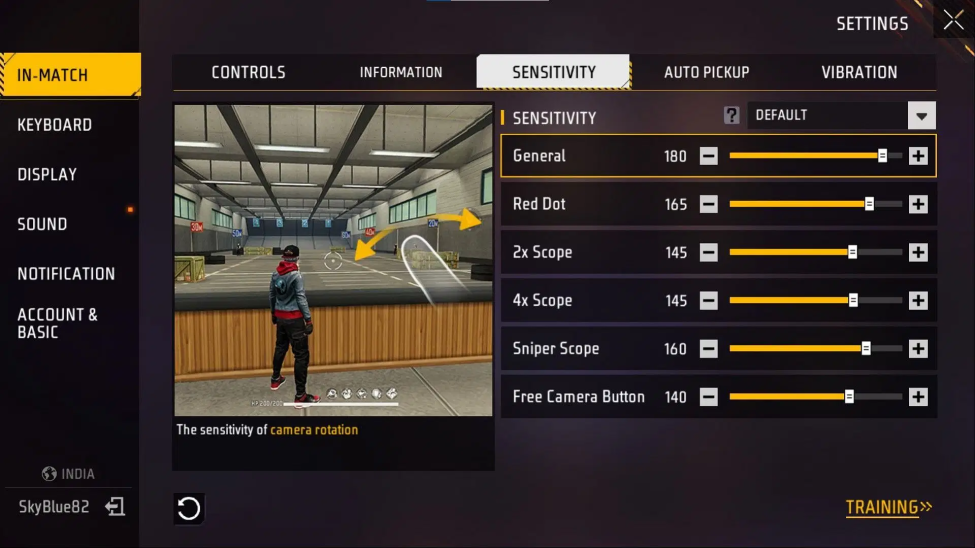
Before you jump into custom servers, you need to understand what each slider does. Free Fire has four main sensitivity sliders: General, Red Dot, Scope, and Free Look. General controls your normal aim and movement, Red Dot is for 1x scopes, Scope covers 2x and above, and Free Look is for looking around without moving your character. If you’re totally new to this, check out our guide on how to set free fire sensitivity settings to get a solid foundation.
Step 2: Choose a Baseline Sensitivity
Instead of starting from scratch, use a proven baseline. You can find one from a pro player or use the free fire sensitivity settings helper tool. This tool lets you input your device specs and play style to get a recommended starting point. For example, if you have a 4GB RAM phone, you’d want something like our free fire sensitivity settings for 4GB RAM – but for custom servers, we’ll tweak it further. Write down your baseline for each slider.
Step 3: Create or Join a Custom Server
Now, head to the custom room section. Create a new room with these settings: Map – Bermuda (since it’s the most balanced), Mode – Classic or Clash Squad (for combat), and set the room to private. If you’re alone, invite a friend or just use bots. The goal is to have a controlled environment where you can test without distractions. Once inside, you’ll have the entire map to yourself (or with a few bots).
Step 4: Adjust General Sensitivity First
Start with the General slider. Move around, run, slide, and do quick 180° turns. If your crosshair overshoots, lower the sensitivity. If you can’t keep up, raise it. A good rule: you should be able to track a running enemy (or bot) without jittering. Also pay attention to camera control – smooth camera movement is key for tracking. Our free fire sensitivity settings for camera control can give you more tips on this.
Step 5: Fine-Tune Red Dot and Scope
Now pick up a weapon with a red dot sight (like the MP40) and test your medium-range aim. Then try a 4x scope on an AR. The goal is to have consistent, smooth aim without overshooting. Adjust these sliders independently – don’t just copy General. If you’re an aggressive rusher who likes close combat, you might want higher red dot sensitivity. Check out free fire sensitivity settings for aggressive rushing for tailored advice.
Step 6: Test in Combat Scenarios
The best test is real combat. Engage bots or friends in 1v1 fights. Notice how quickly you can flick to targets, how stable your aim is while firing, and how easily you can follow moving enemies. Practice all ranges: close, medium, and long. If something feels off, go back and adjust. Remember, the sensitivity that works in a quiet lobby might feel different under pressure, so simulate the heat of a match.
Step 7: Save and Share Your Settings
Once you’re happy, note down your final values. Free Fire allows you to generate a sharing code that others can import. Go to Settings > Sensitivity > Share to get your code. Save it somewhere safe. If you ever switch devices, you can restore them – just know that free fire sensitivity settings after device reset might need tweaking. You can also clone free fire sensitivity settings to quickly replicate setups across accounts.
Common Pitfalls
- Copying pro settings directly: Pro players have different devices and play styles. Always start with a baseline that matches your phone’s specs and your comfort.
- Not accounting for custom server FPS: Custom servers may have higher or lower FPS than standard matches. If your sensitivity feels off after leaving the custom server, note the FPS difference.
- Over-adjusting after a single fight: Don’t change your settings dramatically after losing one duel. Play several matches before making tweaks. Stick to small increments.
Where to Next
Now that your sensitivity is dialed in for custom servers, consider exploring other areas. You can clone free fire sensitivity settings to easily share your setup with squadmates. Or dive into our other guides on weapon-specific sensitivities, like the SCAR or M1014. Keep practicing and tweaking – perfect aim is a journey, not a destination.



