Are you tired of your crosshair flying off enemies or feeling too sluggish in gunfights? You’re not alone. Sensitivity settings can make or break your game, and the best place to fix them is Free Fire’s practice mode. This guide is for anyone—from beginners struggling with recoil to veterans wanting to fine-tune their aim. By the end, you’ll have a custom sensitivity that feels natural and helps you land more shots.
Practice mode is the safest place to experiment because it doesn’t affect your rank. You can shoot bots, test different weapons, and adjust sliders without pressure. We’ll walk you through every step: opening the practice range, understanding the sensitivity sliders, testing with your favorite guns, and saving your perfect settings.
What You’ll Need
- Free Fire or Free Fire Max installed on your device
- 10-20 minutes of uninterrupted time
- A stable internet connection (to avoid lag during testing)
- Patience to repeat steps until it feels right
Step 1: Enter Practice Mode
Launch Free Fire and tap the ‘Practice’ button on the main screen. This takes you to the shooting range where you can run, shoot, and test freely. If you haven’t visited practice mode yet, take a moment to explore—there are targets, bots, and weapon pickup zones.
Step 2: Understand the Sensitivity Sliders
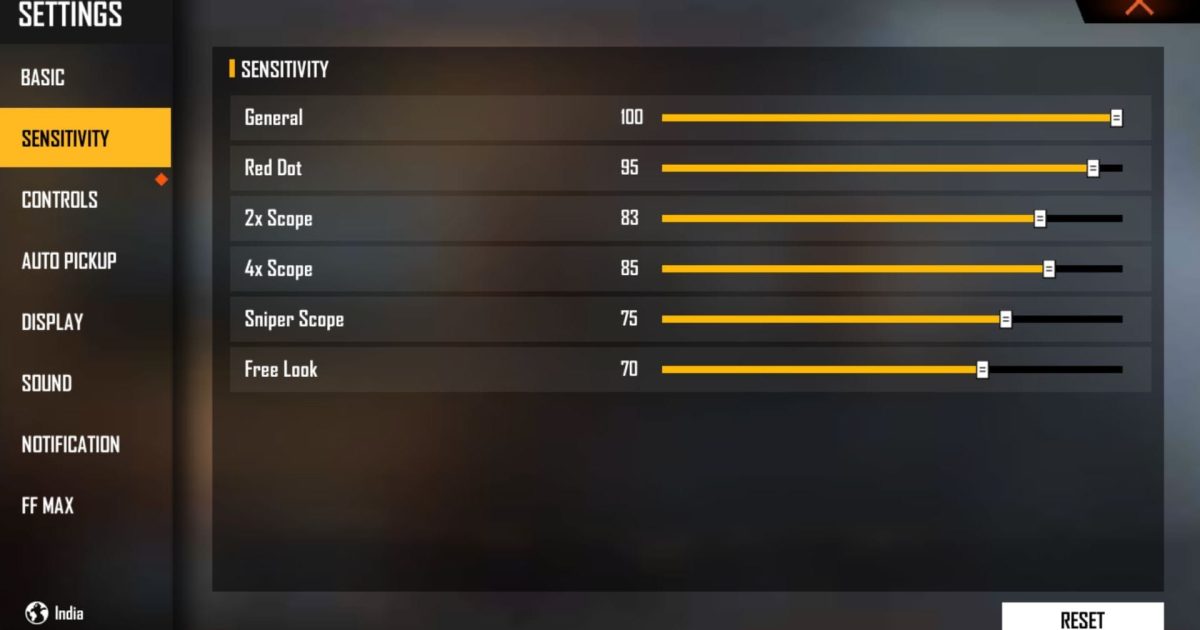
Open settings by tapping the gear icon, then go to the ‘Sensitivity’ tab. You’ll see several sliders: General, Red Dot, 2x Scope, 4x Scope, Sniper Scope, and Free Look. Each controls how fast your aim moves when you swipe. General affects hip-fire and most weapons. Scope-specific sliders help with magnified optics. Free Look controls your camera while running or gliding.
Step 3: Set a Baseline
If you’re starting from scratch, try the ‘Default’ settings first. Many players prefer a General sensitivity between 80-100, but it depends on your phone and playstyle. For a starting point, you can copy popular setups like the easy sensitivity settings or top sensitivity settings. Write down your starting values so you can revert if needed.
Step 4: Test with Different Weapons
Grab a few common weapons—M4A1, AK47, AWM—from the weapon pedestals. Fire at the stationary targets first to see how the crosshair behaves. Then switch to moving targets (the bots that walk side to side). Pay attention to: over-aiming (crosshair passes the target) or under-aiming (can’t keep up). Adjust the relevant slider a few points at a time and test again.

For example, if you’re missing drag shots, fine-tune your General and Red Dot sensitivity. Check out our guide on drag shot headshot settings for specific numbers. For snipers, adjust the Sniper Scope slider until you can flick to targets comfortably. If you play on a budget device, consider our budget phone sensitivity tips to avoid lag.
Step 5: Fine-Tune and Save
Once you feel comfortable with a few weapons, test for five more minutes. Try different distances and strafing. If something feels off, tweak by 2-3 points. Keep a note of your final values. Free Fire has a ‘Save’ button—tap it, and your settings are locked in. You can also share your code or use saved sensitivity codes to instantly apply a setup.
Common Pitfalls
- Forgetting to test with your main weapons: You might dial in sensitivity with an M4 but then pick up a sniper and overshoot. Always test at least two weapon types.
- Changing too many sliders at once: Adjust one slider, test, then adjust another. Big changes make it impossible to know what worked.
- Ignoring Free Look sensitivity: A low Free Look can make it hard to scan the area while running. Set it around 80-100 for better awareness.
Where to Next
Now that your sensitivity is dialed in, practice more in Clash Squad or Classic modes. For even better aim, explore advanced topics like gyro controls or per-scope fine-tuning. Check our guides on accurate aim sensitivity and other pro setups to keep improving. Remember, sensitivity is personal—what works for a streamer might not work for you. Keep tweaking in practice mode until it’s second nature.
