Hey battlers! If you’re struggling with shaky aim or slow camera turns in Free Fire, your camera sensitivity settings are probably off. This guide is for everyone who wants smoother movement and faster target acquisition — whether you’re a beginner or an experienced player looking to refine your setup. By the end of this post, you’ll have a custom sensitivity configuration that feels natural on your device and helps you land more headshots.
Camera sensitivity controls how fast your view moves when you swipe on the screen. Get it right, and you’ll track enemies effortlessly. Get it wrong, and you’ll overshoot or drag too slowly. We’ll walk you through each step, from understanding DPI to fine-tuning your General and Red Dot settings. No fluff, just practical tweaks you can test in the training ground.
What You’ll Need
- Free Fire installed (latest version)
- A device with a decent touch response (any phone or tablet works)
- At least 15 minutes of free time for testing
- Optional: a second device or screen recorder to note changes
- Patience — finding your perfect sensitivity takes trial and error
Step 1: Understand Your Current DPI and In-Game Sensitivity
Before changing anything, check your device’s DPI setting. DPI (dots per inch) affects how many pixels your finger moves per inch of swipe. Most phones have a default DPI around 300-480. If you’ve used a game booster or changed your DPI manually, note that number. Lower DPI means slower cursor movement on the screen. For Free Fire, a DPI of 300 to 600 is common. You can check your DPI using apps like “DPI Changer” or by looking at your device’s developer options.
Step 2: Reset to Defaults and Start from Scratch
Go to Free Fire’s Settings > Sensitivity. Tap “Reset” to clear any previous tweaks. This gives you a clean slate. Write down your current values if you want to revert later, but trust me — starting fresh is better. If you already have a config you like, you can skip this step, but for the sake of this guide, we’ll assume you’re optimizing from zero.

Step 3: Set Your General Camera Sensitivity
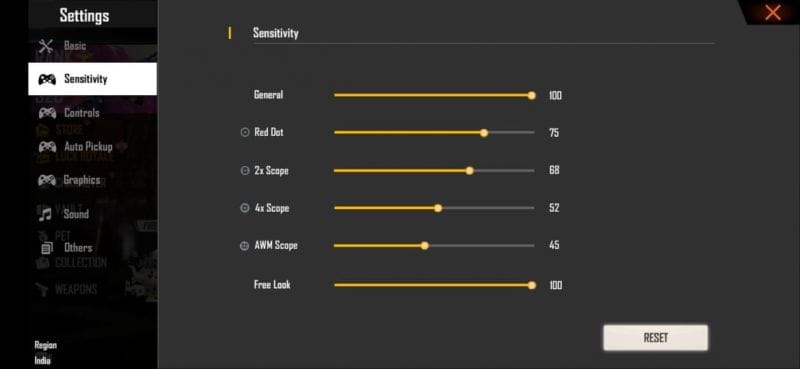
General sensitivity affects your camera movement when not using a scope. For most players, a value between 80 and 100 works well. Start at 85. If you find it too slow, increase by 5. Too fast? Decrease by 5. Remember, you want to be able to do a 180-degree turn with one full swipe across the screen. Test this in the training ground by spinning around and trying to track a moving target.
Step 4: Adjust Red Dot and Scope Sensitivities
Red Dot sensitivity is crucial for mid-range fights. Start at 90. For 2x scope, try 85; for 4x, try 75; for sniper scope, 60 is a common sweet spot. These values assume you’re using a DPI around 400. If you’re on a tablet or have a lower DPI, you may need higher numbers. Always test each scope level by aiming at a stationary target and swiping to see if you can smoothly track it.

Step 5: Fine-Tune Based on Your Playstyle
Are you a rusher who likes to jump into combat? Then your general sensitivity should be higher (90-100). More of a camper? Lower sensitivity (70-80) helps with precise aiming. If you often do drag shots (quick scope), your red dot sensitivity should match your general sensitivity or be slightly lower. For more on drag setups, check out our guide on latest free fire sensitivity settings for drag shot.

Step 6: Test in Training Ground and Ranked Matches
Once you have your baseline numbers, spend 10 minutes in the training ground. Practice moving while aiming, flicking to targets, and doing 360 spins. Don’t be afraid to adjust by 2-3 points if something feels off. After you’re comfortable, play a ranked match. Your sensitivity might feel different under pressure — that’s normal. Note any issues: is your aim overshooting? Lower sensitivity. Can’t turn fast enough? Increase it. Also, remember that after a season reset, weapon stats might change slightly, so our free fire sensitivity settings after season reset guide can help you recalibrate.

Common Pitfalls
- Ignoring touch delay: If your device has high touch latency, even perfect sensitivity will feel sluggish. Check our free fire sensitivity settings for touch delay guide to compensate.
- Copying pro settings blindly: Pros use different DPI and devices. What works for them may not work for you. Always customize.
- Not matching HUD: Your HUD layout affects how you swipe. If your fire or joystick button obstructs your swipe area, you’ll struggle. Learn how to match hud with free fire sensitivity settings.
Where to Next?
Congratulations! You now have a solid camera sensitivity setup. Practice makes perfect, so keep tweaking as you improve. If you want to take it further, explore our other resources: free fire sensitivity settings under 300 dpi for low-DPI devices, free fire dpi 600 sensitivity settings for high-DPI phones, or learn how to import free fire sensitivity settings to quickly copy configs. Stay sharp, and see you on the battlefield!
