If you’re playing Free Fire on a PC emulator or using a mouse with customizable DPI, you know that finding the perfect sensitivity can make or break your game. This guide is specifically for players who use 900 DPI – a common sweet spot that balances speed and control. By the end, you’ll have a tuned sensitivity config that helps you land headshots, control spray, and react fast without overshooting.
We’ve tested these settings across different weapons and playstyles. Whether you’re aggressive or defensive, these numbers will serve as a solid foundation. Remember, sensitivity is personal, so treat this as a starting point. With our step-by-step instructions, you’ll be able to tweak and lock in your ideal setup in under 30 minutes.
What You’ll Need
- A Free Fire account (obviously)
- A device with a mouse or emulator (e.g., Gameloop, Bluestacks)
- Access to your mouse’s DPI settings (software like Logitech G Hub, or Windows mouse settings)
- Around 15 minutes of free time
- Patience for minor adjustments
Step 1: Understand DPI and In-Game Sensitivity
DPI determines how many pixels your cursor moves per inch of mouse movement. Multiply DPI by in-game sensitivity for effective sensitivity (e.g., 900 DPI × 85 general sensitivity = 76500 effective). For 900 DPI, you want moderate in-game values – not too high that you shake, not too low that you drag. Keep this in mind as we dive in.
Step 2: Set Your Mouse to 900 DPI
Open your mouse configuration software (or Windows mouse settings) and set the DPI to 900. If your mouse has hardware buttons, double-check that the correct profile is active. This step is crucial – if you’re at 800 or 1000 DPI, the in-game values below won’t work as intended.

Step 3: Configure Free Fire In-Game Sensitivity
Launch Free Fire, go to Settings > Sensitivity. Set the following values as a baseline. We’ve adjusted these for 900 DPI – they’re a blend of popular sensitivity settings you’ll find on pro configs.
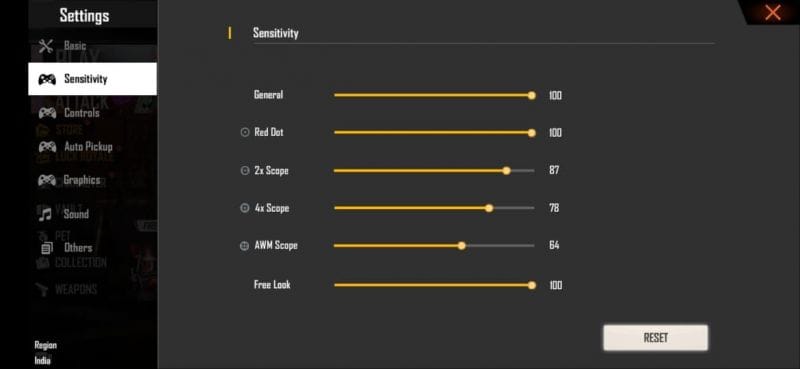
- General: 85
- Red Dot: 75
- 2x Scope: 50
- 4x Scope: 30
- Sniper Scope: 25
- Free Look: 60
Step 4: Fine-Tune for Weapons
Different weapons need tweaks. For SMGs like MP40, keep general high (85-90) for fast movement. For ARs like SCAR or M4, reduce by 5-10 for better spray control. Snipers benefit from lower scope sensitivity – feel free to drop 4x to 25 and sniper to 20. These adjustments mirror what you’d see in a sensitivity settings tutorial for specific weapons.
Step 5: Test in Training Mode and Custom Room
Head to Training Mode to test your aim. Use the weapons you use most. If you feel the aim is too fast, reduce general by 5; if too slow, increase by 5. Then jump into a Custom Room (or a ranked match) to test under pressure. This is where the ranked sensitivity settings from other guides come in handy – they’ve been battle-tested.
Step 6: Save and Lock In
Once you’re happy, tap Save. Take a screenshot of your settings so you can revert if you accidentally change them. Also, bind your fire button to a comfortable spot – this pairs well with your new DPI config. Check out the new meta sensitivity settings for the latest tweaks.
Common Pitfalls
- Setting general too high (above 95) leads to shaky aim – stick to 85-90 on 900 DPI.
- Forgetting to apply the same DPI in all apps – some emulators override mouse settings; double-check.
- Not adjusting fire button sensitivity – if you tap too slow, increase fire button sensitivity to match your new DPI.
Where to Next?
Now that you’ve dialed in your 900 DPI sensitivity, explore more advanced configs. If you want even better headshots, check our headshot sensitivity settings. For a broader setup, see our sensitivity settings tutorial. And if you’re curious what the pros use, our pro sensitivity settings guide has you covered. Good luck out there!



