Are you tired of missing shots in Free Fire but seeing TikTok players land headshots effortlessly? You’re not alone. In this guide, I’ll walk you through the exact sensitivity settings used by top TikTok Free Fire creators—and show you how to adapt them to your own device. By the end, you’ll have a setup that feels smooth, responsive, and perfect for ranked or scrims.
Whether you’re a thumb player or a four‑finger claw, these steps will help you find your sweet spot. We’ll cover everything from the basic sliders to advanced fine‑tuning. And if you need a refresher, check out the complete free fire sensitivity settings guide for a deeper dive.
What You’ll Need
- Free Fire installed on your device (latest version recommended).
- A stable internet connection (ping under 100 ms is ideal).
- At least 10 minutes in a training room or classic match to test.
- A second device or screenshot tool to save your original settings.
- Patience – finding the perfect sensitivity takes a few iterations.
Step 1: Understand Sensitivity Basics
Sensitivity controls how fast your crosshair moves when you drag your finger. Higher values mean quicker turns but less precision. TikTok players often use a mix of high general sensitivity and low scope sensitivity for control. Before we copy anything, open your settings and note your current numbers so you can revert if needed.
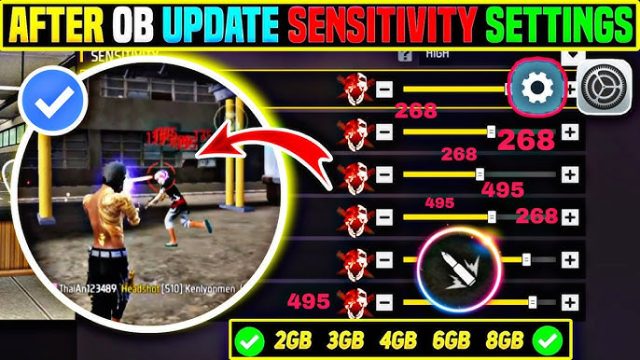
Step 2: Access the Sensitivity Settings
Tap the gear icon on the main lobby, then go to Controls, then Sensitivity. You’ll see sliders for Red Dot, 2x Scope, 4x Scope, Sniper, and Free Look. If you’re using a claw setup, remember that your finger placement affects how much you drag – you might need different values. For claw users, we have a dedicated free fire sensitivity settings for claw users guide.
Step 3: Copy Settings from Top TikTok Players
Based on aggregated data from popular TikTok creators, here’s a starting point: General: 90-100, Red Dot: 85-95, 2x Scope: 80-90, 4x Scope: 70-80, Sniper: 30-40, Free Look: 65-75. These settings work well for most mid-range to high-end phones. If you’re on a budget device, start lower and adjust. The free fire sensitivity settings for smooth gameplay guide uses similar values.
Step 4: Fine-Tune for Your Device
No two phones are alike. Head to the training room, pick an AR like the M4 or AWM, and test the settings. Drag your crosshair while tracking a target. If you overshoot, reduce the scope sensitivity. If it feels sluggish, increase it. This step is crucial – even pro players spend hours tweaking. For more tips, see how to optimize free fire sensitivity settings.
Step 5: Test in Ranked or Scrims
Once the training room feels good, jump into a ranked match. Focus on close-range fights and spraying. If you find your aim shaky, return to the range and adjust by 2-3 points at a time. Remember that sensitivity is personal – what works for one TikTok star may not be perfect for you. Check out the latest free fire sensitivity settings for ranked for more refined numbers.
Common Pitfalls
- Skipping the training room – you need muscle memory, not just numbers.
- Blindly copying without considering your screen size and frame rate – lower FPS may need lower sensitivity to avoid jitter.
- Changing too many values at once – adjust one slider at a time and test thoroughly.
Where to Next
Now that you have a solid foundation, explore more advanced tweaks. The free fire sensitivity settings for pro players guide shares insights from competitive players. And if you’re struggling with headshots, the free fire sensitivity settings and headshot combo guide can help. Remember, consistency comes from practice – so get out there and start fragging!